멀티 모듈을 사용하는 이유는 다음과 같다.
1. 빌드 속도 개선
- Gradle은 변경된 모듈만 다시 빌드
- 앱이 커질수록 전체를 빌드하는데 시간이 오래걸리기 때문에 기능 단위로 모듈을 나누면 변경된 부분만 빠르게 빌드
2. 관심사 분리
- 각 모듈은 기능 또는 역할 단위로 나뉘며 독립적으로 개발되고 테스트 됨
- 유지보수가 쉬워지고 코드의 가독성도 향상
3. 재사용성 증가
- 공통 로직을 별도 모듈로 만들어 쉽게 재사용
이러한 이유로 안드로이드 멀티모듈 작업을 하기로 마음먹었다!
1. 모듈 생성

file -> new -> new module 선택
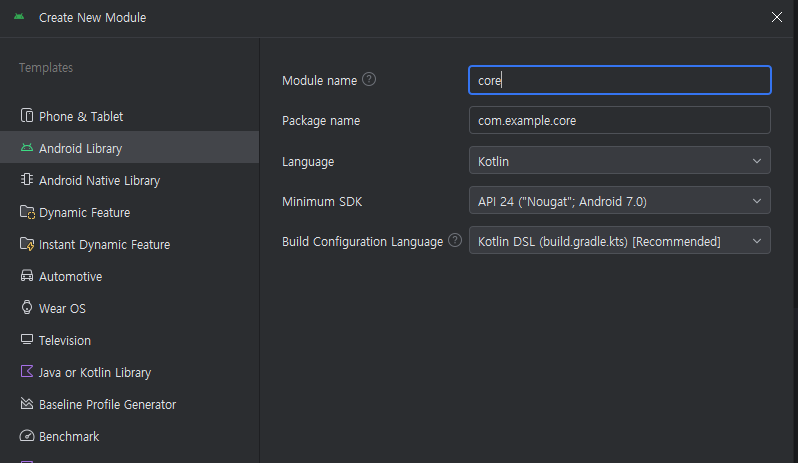
android library 선택 후 모듈 이름 작성
나는 간단한 게시판 앱이라서 core, feature 모듈을 만들어 주었다.
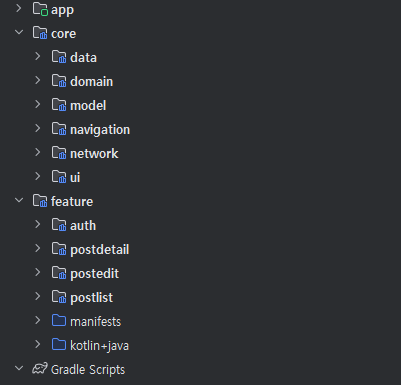
또한, 안에는 각 기능별로 모듈을 생성해 주었다. (같은 방식으로 생성!)
게시판은 게시글 리스트 페이지, 게시글 상세 페이지, 게시글 작성페이지가 있다.
2. Post 구현
package com.example.model

data class Post(
    val id:Int,
    val title:String,
    val content:String,
    val author: String,
    val createdAt:String
)
나는 :core:model 모듈에 Post 클래스를 작성했다.
그리고 바로 api 작성하기
3. API 클래스 작성
package com.example.network

import com.example.model.Post
import retrofit2.Response
import retrofit2.http.Body
import retrofit2.http.GET
import retrofit2.http.POST
import retrofit2.http.PUT
import retrofit2.http.Path

interface PostApiService {

    @GET("/posts")
    suspend fun getPosts():List<Post>

    @GET("/posts/{id}")
    suspend fun getPostDetail(@Path("id") id:Int):Post

    @POST("/posts")
    suspend fun createPost(@Body post:Post):Response<Unit>

    @PUT("/posts/{id}")
    suspend fun updatePost(
        @Path("id") id:Int,
        @Body post: Post
    ):Response<Unit>
}
전체 리스트를 가져오기, 게시글 상세보기, 게시글 작성하기, 게시글 수정하기가 있다.
이 코드는 :core:network 에 작성했다.
4. Repository
interface PostRepository {

    val posts: StateFlow<List<Post>>

    suspend fun getPosts(): List<Post>
    suspend fun getPostDetail(id:Int) :Post
    suspend fun createPost(post:Post)
    suspend fun updatePost(post: Post)
}
repository 는 :core:domain 에 작성
5. Repository 구현체
@Singleton
class PostRepositoryImpl @Inject constructor(private val api:PostApiService):PostRepository {

    private val _posts = MutableStateFlow<List<Post>>(
        mutableListOf( Post(
            id = 1,
            title = "Compose로 만드는 투두 앱",
            content = "Jetpack Compose와 MVVM 아키텍처를 활용한 투두 앱 예제입니다.",
            author = "안드로이드 개발자",
            createdAt = "2024-06-01T09:00:00"
        ),
        Post(
            id = 2,
            title = "DI와 Hilt 완전정복",
            content = "Hilt를 이용해 의존성 주입을 간편하게 관리하는 방법을 소개합니다.",
            author = "DI 마스터",
            createdAt = "2024-06-03T14:30:00"
        ),
        Post(
            id = 3,
            title = "Compose Navigation 기초",
            content = "컴포즈에서 화면 전환을 처리하는 Navigation 기본기를 배웁니다.",
            author = "Jetpack 고수",
            createdAt = "2024-06-05T18:45:00"
        )
        )
    )

    override val posts: StateFlow<List<Post>> = _posts

    override suspend fun getPosts(): List<Post> {
        return posts.value
    }

    override suspend fun getPostDetail(id: Int): Post {
        return  posts.value.find { it.id == id }!!
    }

    override suspend fun createPost(post: Post) {
        val newPost = post.copy(
            id = (posts.value.maxOfOrNull { it.id } ?: 0) + 1,
            createdAt = "20250610"
        )
        _posts.value = posts.value + newPost
    }

    override suspend fun updatePost(post: Post) {
        _posts.value = posts.value.map {
            if (it.id == post.id) post else it
        }
    }
}
서버가 없기 때문에 임시로 게시글 리스트를 생성해서 작업했다. 왜냐하면 멀티모듈+ 클린아키텍처 공부를 위한거니까~
stateFlow를 사용해서 viewModel에서 상태를 계속 관찰하고 UI에 반응형으로 전달했다.
6. ViewModel
package com.example.postlist

import androidx.lifecycle.ViewModel
import com.example.domain.PostRepository
import com.example.model.Post
import dagger.hilt.android.lifecycle.HiltViewModel
import kotlinx.coroutines.flow.StateFlow
import javax.inject.Inject

@HiltViewModel
class PostListViewModel @Inject constructor(
    private val repository:PostRepository
) :ViewModel(){

    val posts: StateFlow<List<Post>> = repository.posts

}
viewModel은 간단하게 작성. :feature:postlist 안에다가 만들었다.
7. UI
컴포즈를 사용해 본 적이 없어서 이번에 사용해 보기로 했다.
package com.example.ui

import androidx.compose.foundation.clickable
import androidx.compose.foundation.layout.Arrangement
import androidx.compose.foundation.layout.Column
import androidx.compose.foundation.layout.Row
import androidx.compose.foundation.layout.fillMaxWidth
import androidx.compose.foundation.layout.padding
import androidx.compose.foundation.lazy.LazyColumn
import androidx.compose.foundation.lazy.items
import androidx.compose.material.icons.Icons
import androidx.compose.material.icons.filled.Add
import androidx.compose.material.icons.filled.Edit
import androidx.compose.material3.Divider
import androidx.compose.material3.FloatingActionButton
import androidx.compose.material3.Icon
import androidx.compose.material3.IconButton
import androidx.compose.material3.MaterialTheme
import androidx.compose.material3.Scaffold
import androidx.compose.material3.Text
import androidx.compose.runtime.Composable
import androidx.compose.runtime.collectAsState
import androidx.compose.runtime.getValue
import androidx.compose.ui.Modifier
import androidx.compose.ui.unit.dp
import com.example.postlist.PostListViewModel

@Composable
fun PostListScreen (
    viewModel: PostListViewModel,
    onPostClick:(Int)->Unit,
    onWriteClick:()->Unit,
    onEditClick:(Int)->Unit
){

    val posts by viewModel.posts.collectAsState()

    Scaffold(
        floatingActionButton = {
            FloatingActionButton(
                onClick = onWriteClick
            ) {
                Icon(Icons.Default.Add, contentDescription = "글 작성")
            }
        }
    ) { padding ->
        LazyColumn(contentPadding = padding) {
            items(posts) { post ->
                Row(
                    modifier = Modifier
                        .fillMaxWidth()
                        .padding(16.dp),
                    horizontalArrangement = Arrangement.SpaceBetween
                ) {
                    Column(
                        modifier = Modifier
                            .weight(1f)
                            .clickable { onPostClick(post.id) }
                    ) {
                        Text(text = post.title, style = MaterialTheme.typography.titleMedium)
                        Text(text = "by ${post.author}", style = MaterialTheme.typography.bodySmall)
                    }

                    IconButton(onClick = { onEditClick(post.id) }) {
                        Icon(Icons.Default.Edit, contentDescription = "수정")
                    }
                }

                Divider()
            }
        }
    }


}
게다가 xml로 개발 했을 때 navigation을 사용했었는데 컴포즈에서는 어떻게 구성하는지 궁금해서 그것도 사용해 보기로...ㅎㅎ
8. Navigation
Jetpack Navigation-Compose 라이브러리 의존성을 build.gradle에 추가.
(저는 :core:navigation 모듈을 만들었습니다. 이 모듈 안의 build.gradle에 추가)
dependencies {
    implementation "androidx.navigation:navigation-compose:2.7.7" // 또는 최신 버전
}
먼저 각 화면 단위로 sealed class를 정의해 준다.
package com.example.navigation

sealed class Screen(val route: String) {

    object PostList: Screen("post_list")
    object PostDetail: Screen("post_detail/{postId}"){
        fun routeWithArgs(postId:Int) = "post_detail/$postId"
    }
    object PostEdit :Screen("post_edit?postId={postId}") {
        fun routeWithArgs(postId:Int?):String {
            return if (postId != null) "post_edit?postId=$postId" else "post_edit"
        }
    }

}
그다음 각 화면으로 이동하는 동작들을 구현해 준다.
package com.example.navigation

import androidx.compose.runtime.Composable
import androidx.hilt.navigation.compose.hiltViewModel
import androidx.navigation.NavHostController
import androidx.navigation.NavType
import androidx.navigation.compose.NavHost
import androidx.navigation.compose.composable
import androidx.navigation.compose.rememberNavController
import androidx.navigation.navArgument
import com.example.ui.PostDetailScreen
import com.example.ui.PostEditScreen
import com.example.ui.PostListScreen

@Composable
fun  AppNavHost(navController: NavHostController = rememberNavController()) {

    NavHost(navController, startDestination = Screen.PostList.route) {
        composable(Screen.PostList.route) {
            PostListScreen(
                onPostClick = { postId -> navController.navigate(Screen.PostDetail.routeWithArgs(postId)) },
                onWriteClick = { navController.navigate(Screen.PostEdit.route) },
                onEditClick = {postId -> navController.navigate("post_edit?postId=$postId")},
                viewModel = hiltViewModel()
            )
        }

        composable(Screen.PostDetail.route , arguments = listOf(
                navArgument("postId") { type = NavType.IntType }
                )
        ) { backStackEntry ->
            PostDetailScreen()
        }

        composable(Screen.PostEdit.route,
            listOf(navArgument("postId") {
                type = NavType.IntType
                defaultValue= -1
            })
        ) { backStackEntry ->

            val postIdArg = backStackEntry.arguments?.getInt("postId")?: -1
            val postId = if (postIdArg == -1) null else postIdArg

            PostEditScreen(
                postId = postId,
                onPostSaved = {navController.popBackStack()}
            )
        }
    }
}
여기서 봐야 할 부분은 PostDetail로 이동하는 코드다.
arguments = listOf(navArgument("postId") { type = NavType.IntType })
이렇게 코드를 작성하면 @HiltViewModel 에 주입되는 SavedStateHandle은 Navigation Compse에서 넘긴 navArgument를 자동으로 받아온다
- PostDetailViewModel 작성
package com.example.postdetail

import androidx.lifecycle.SavedStateHandle
import androidx.lifecycle.ViewModel
import androidx.lifecycle.viewModelScope
import com.example.domain.PostRepository
import com.example.model.Post
import dagger.hilt.android.lifecycle.HiltViewModel
import kotlinx.coroutines.flow.MutableStateFlow
import kotlinx.coroutines.flow.StateFlow
import kotlinx.coroutines.launch
import javax.inject.Inject

@HiltViewModel
class PostDetailViewModel @Inject constructor(
    private val repository: PostRepository,
    savedStateHandle: SavedStateHandle
) : ViewModel() {

    private val _post = MutableStateFlow<Post?>(null)
    val post: StateFlow<Post?> = _post

    init {
        val postId = savedStateHandle.get<Int>("postId") ?: -1
        viewModelScope.launch {
            _post.value = repository.getPostDetail(postId)
        }
    }
}
- PostDetailScreen
package com.example.ui

import androidx.compose.foundation.layout.Column
import androidx.compose.foundation.layout.padding
import androidx.compose.material3.CircularProgressIndicator
import androidx.compose.material3.MaterialTheme
import androidx.compose.material3.Text
import androidx.compose.runtime.Composable
import androidx.compose.runtime.collectAsState
import androidx.compose.runtime.getValue
import androidx.compose.ui.Modifier
import androidx.compose.ui.unit.dp
import androidx.hilt.navigation.compose.hiltViewModel
import com.example.postdetail.PostDetailViewModel

@Composable
fun PostDetailScreen(
    viewModel: PostDetailViewModel = hiltViewModel()
) {
    val uiState by viewModel.post.collectAsState()

    if (uiState != null) {
        Column(modifier = Modifier.padding(16.dp)) {
            Text(text = uiState!!.title, style = MaterialTheme.typography.headlineMedium)
            Text(text = "by ${uiState!!.author}", style = MaterialTheme.typography.bodySmall)
            Text(text = "작성일: ${uiState!!.createdAt}", style = MaterialTheme.typography.bodySmall)
        }
    } else {
        CircularProgressIndicator()
    }
}
이렇게 상세 페이지 까지 했고 그 다음 등록/수정 페이지 ( 같은 페이지를 재사용 한다.)
- PostEditViewModel
@HiltViewModel
class PostEditViewModel @Inject constructor(
    private val postRepository: PostRepository
) :ViewModel(){

    private val _title = MutableStateFlow("")
    val title :StateFlow<String> = _title

    private val _content = MutableStateFlow("")
    val content : StateFlow<String> = _content

    private val _isSaving = MutableStateFlow(false)
    val isSaving:StateFlow<Boolean> = _isSaving

    fun onTitleChanged(newTitle:String) {
        _title.value = newTitle
    }

    fun onContentChanged(newContent:String) {
        _content.value = newContent
    }

    fun loadPost(postId:Int) {
        viewModelScope.launch {
            try {
                val post = postRepository.getPostDetail(postId)
                _title.value = post.title
                _content.value = post.content
            } catch (e:Exception) {
                Log.e("TAG", "loadPost: ${e.message}" )
            }
        }

    }

    fun savePost(postId:Int?,onSaved: ()->Unit) {

        viewModelScope.launch {
            _isSaving.value = true

            val post = Post(
                id = postId ?: 0,
                title = _title.value,
                content = _content.value,
                author = "ㅇㄴㅇ",
                createdAt = "20250611"
            )

            if (postId == null) {
                postRepository.createPost(post)
            } else {
                postRepository.updatePost(post)
            }

            _isSaving.value = false
            onSaved()
        }
    }
}
- PostEditScreen
package com.example.ui

import androidx.compose.foundation.layout.Column
import androidx.compose.foundation.layout.Spacer
import androidx.compose.foundation.layout.fillMaxSize
import androidx.compose.foundation.layout.fillMaxWidth
import androidx.compose.foundation.layout.height
import androidx.compose.foundation.layout.padding
import androidx.compose.material3.Button
import androidx.compose.material3.MaterialTheme
import androidx.compose.material3.OutlinedTextField
import androidx.compose.material3.Text
import androidx.compose.runtime.Composable
import androidx.compose.runtime.LaunchedEffect
import androidx.compose.runtime.collectAsState
import androidx.compose.runtime.getValue
import androidx.compose.ui.Alignment
import androidx.compose.ui.Modifier
import androidx.compose.ui.unit.dp
import androidx.hilt.navigation.compose.hiltViewModel


@Composable
fun PostEditScreen(
    postId: Int? = null,
    viewModel: com.example.postedit.PostEditViewModel = hiltViewModel(),
    onPostSaved: ()->Unit
) {

    val title by viewModel.title.collectAsState()
    val content by viewModel.content.collectAsState()
    val isSaving by viewModel.isSaving.collectAsState()

    LaunchedEffect(postId) {
        postId?.let {
            viewModel.loadPost(it)
        }
    }

    Column(
        modifier = Modifier
            .fillMaxSize()
            .padding(16.dp)
    ) {

        Text(text = if (postId == null) "새 글 작성" else "글 수정", style = MaterialTheme.typography.titleMedium)

        Spacer(modifier = Modifier.height(16.dp))

        OutlinedTextField(
            value = title,
            onValueChange ={viewModel.onTitleChanged(it)},
            label = { Text("제목") },
            modifier = Modifier.fillMaxWidth()
        )


        Spacer(modifier = Modifier.height(24.dp))

        OutlinedTextField(
            value = content,
            onValueChange = {viewModel.onContentChanged(it)}
                ,
            label = { Text("내용") },
            modifier = Modifier
                .fillMaxWidth()
                .height(200.dp)
                ,
            maxLines = Int.MAX_VALUE
        )

        Button(
            onClick = {
                viewModel.savePost(postId,onPostSaved)
            },
            enabled = !isSaving,
            modifier = Modifier.align(Alignment.End)
        ) {
            Text(text = if (postId == null) "저장하기" else "수정 완료")
        }

    }

}
screen 클래스들은 전부 :core:ui 모듈에 작성했다.
이렇게만 해줘도 일단은 간단한 게시글 앱이 완성이 된다.
코드를 보면 di hilt도 사용을 했는데 처음에는 어디에다가 패키지를 만들어서 사용해야하는지 감이 안 왔다.
그리고 각 모듈마다 중복되는 dependencies가 많아서 관리하는게 힘들었는데 찾아보니까
의존성을 공통으로 관리해주는 build-logic 구조가 있다고 해서 공부중이다.
아직 컴포즈 ui 가 와닿지가 않아서 더 꾸준히 연습하고 새로운 최신 신기술을 더 많이 익혀야겠다.
'안드로이드' 카테고리의 다른 글
| [안드로이드] 컴포즈 build-logic, convention 멀티모듈 빌드 로직 관리하기 (1) | 2025.06.18 |
|---|---|
| [안드로이드] Hilt @Qualifier란 ? (0) | 2022.10.31 |
| [안드로이드] StateFlow 알아보기 (0) | 2022.10.19 |
| [안드로이드] mvvm 패턴 (0) | 2022.10.16 |
| [안드로이드] Hilt - 2 (@Binds vs @Provides) (0) | 2022.10.14 |